 Connect
 Events
 Business
 Organizations
 Entertainment and Media
 API
API Tools
Tools Learning Center
 Support
 Support Articles
Video Marketing Tools
Take Control of Your Streaming Content and Reach Your Target Market.
Use video hosting, advanced analytics, lead capture, a white-label streaming solution, a player APi, and mobile SDKs to bring your video content marketing strategy to life.
No credit card required. By clicking Start Free Trial you agree to ourterms and conditions.
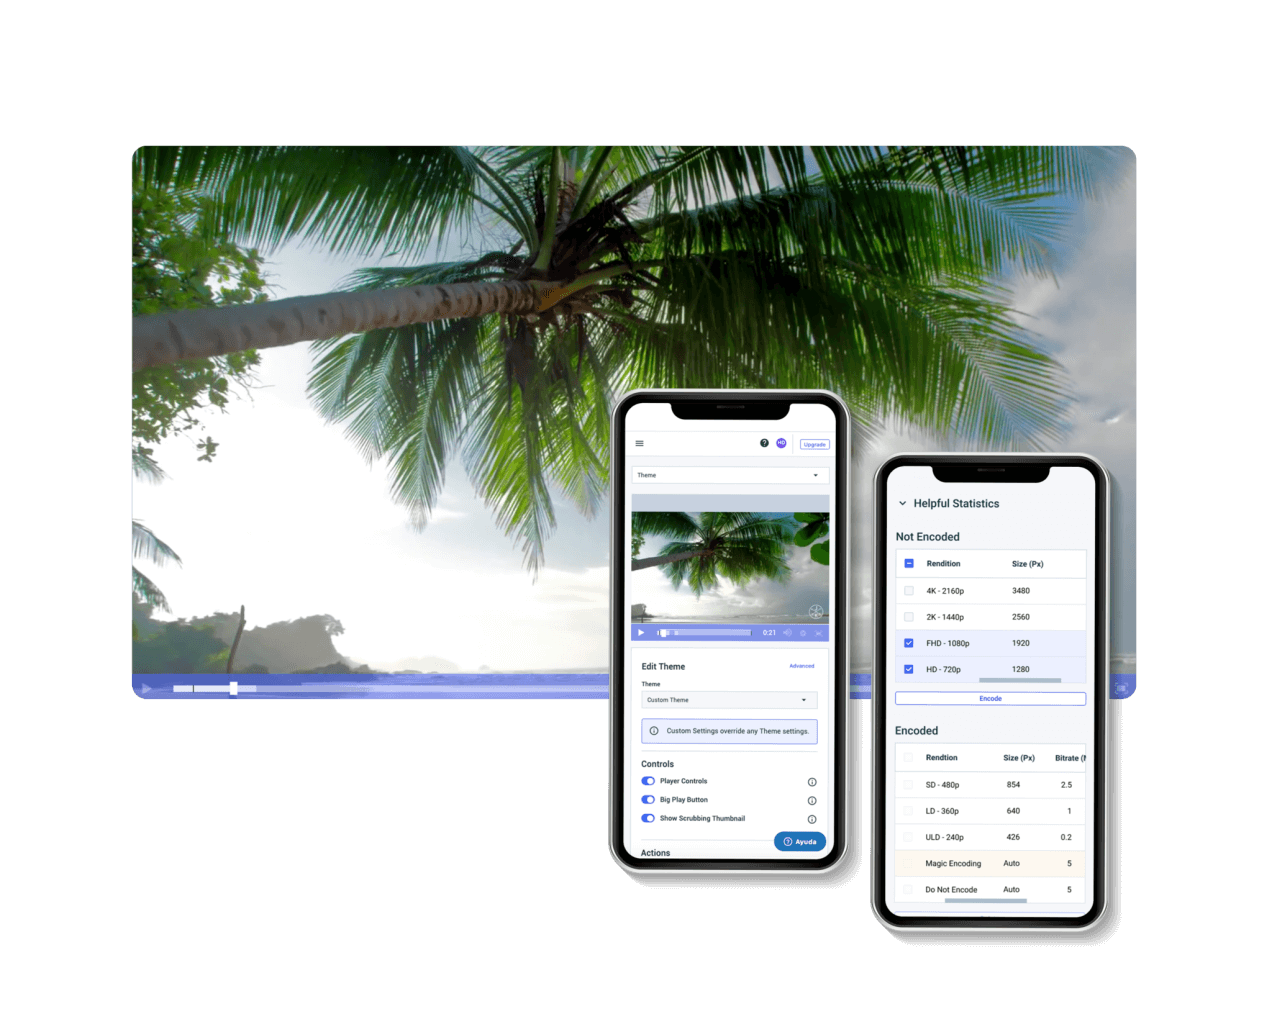
Player API and Mobile SDKs
Add customization to your video player.
Customize your video player with the help of player API. Use mobile SDKs to add your video player to your mobile apps. Learn MoreAdvanced Analytics
Assess your content’s performance.
Use advanced video analytics to track your progress and ensure that your video content is reaching the intended audience. Get information about your viewers, including where they’re tuning in from, what devices they’re using to watch your content, and derive actionable insights. Get Insights

Live Streaming, VOD and Video Playback
Record live streams for to playback later.
Our unified platform offers tools for live streaming, VOD, and video playback, so you can broadcast in the style that makes the most sense for your audience. Choose the methods that will help you accomplish what you’ve set out to achieve. I'm InterestedCalls-to-Action
Guide your audience to action.
Use CTAs to give your audience direction. Let them know what action you’d like them to take once they’ve landed on your video. Get the Details
Embed Video on your Website
Add a video player to your site.
Want to bring viewers to your website? Embed your video player on your site to take control of the branding, pop-ups, widgets, and any other elements that your viewers encounter while watching your video. Let's GoWhite-Label Player
Broadcast without off-brand distractions.
Utilize white-label options to remove any trace of third-party branding or advertising that may distract viewers from your content. Explore the PlayerRobust Video Player Features
Enhance Your User Experience

Capture
Live Captions and Subtitles
Dacast’s video player is compatible with 608/708 live captions. You can also add subtitles to any VOD.
Read more
Stream
Geographic and Referrer Restrictions
Restrict access to your content based on geographic regions or/and domains.
Let's Go
Engage
Use Alternate Player
We recommend using our player to access all the features. It is also possible to use a custom video player.
Get Started“The support that Dacast offers is particularly good compared to other streaming providers, making them a clear choice for my business.”
CEO at ComeSee TV
24/7 Technical Support
The reliable help you need, when you need it
Our customer service team is here 24/7 to help you make the most of your streaming solution. Plus access a comprehensive knowledge base and dynamic online community of professionals.
SupportMost Popular Features

Mobile Streaming
Stream live to phones
Our HTML5 video player ensures compatibility with modern devices and browsers. No configuration is required, whether on a smartphone or a smart TV.
Learn more
White-label Platform
Your logo, your brand
Customize our video player with your logo and colors to put your brand front and center. The look and feel of your content are completely up to you.
Show Me How
High-Definition
Broadcast in full HD quality
Deliver pristine, quality video with multi-bitrate technology in full HD 1080p resolution to ensure that every viewer has an optimal experience.
Stream in HD
Embed Videos
Share video content
Use embed codes to easily share a video or live stream on any web page. Or, share videos with others via social media.
Get Started
Video Transcoding
Deliver your video
Use our transcoding services to offer your viewers the video quality they need according to their devices.
Let's Go
Secure Video Upload
Handle your video library
Bulk upload your video and add the layer of security your want. Access more video uploading and security tools via our advanced video hosting platform.
Upload SecurelyBest Streaming Pricing
Feature-rich and cost-competitive
Dacast is the only video platform offering high-performance live streaming and video hosting features at the best prices on the market.
Check It Out6 Reasons to Choose Dacast
Live Streaming and Video Hosting Platform